
RTF TO XML
Quick Start
Version 5.2.1
For information on commercial use, support, and version updates please visit:
Introduction •
Usage Limitations •
References •
How to install the application? •
How to run the application from GUI and set up the compatibility options for FO renderers? •
How to convert an RTF file to XSL FO? •
How to select a directory to store XSL FO files in? •
How to convert an RTF file to a pair of XML data file and XSL stylesheet file? •
How to prepare an XSLT template from a specially designed RTF document? •
How to create and use a custom character style? •
How to create a field of the DOCPROPERTY type? •
How to specify points for cyclic expansion? •
The RTF TO XML converter is designed to convert Rich Text Format (RTF) files to well-formed Extensible Markup Language (XML) documents according to the Extensible Stylesheet Language Formatting Objects (XSL FO) specification.
Different versions of RTF TO XML have different usage limitations:
Evaluation version limitations
· | Text content is stained with characters occasionally replaced with punctuation marks; |
· | Not all text data entries are moved to XML data file in prepare-template mode. |
Standard license limitations
· | No batch and recursive conversion; |
· | No open API. |
More info about the product you can read in the Readme and User’s Guide documents that are provided with the product.
For information on commercial use, support, and version updates please visit
To start the installation, run the rtf_to_xml.exe file supplied in the distribution archive and follow the instructions of the Wizard.
1. | To start the GUI, run the command rtf_to_xml from a console (DOS) window or using Start / Run in Windows. You will see the following: |
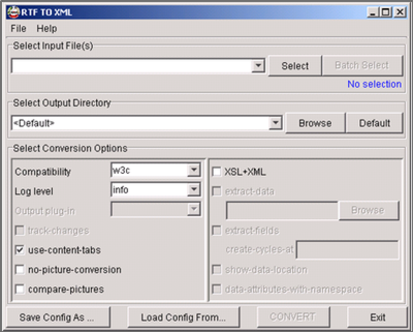
2. | Click on the Compatibility combo box in the Select Conversion Options pane and select a compatibility model you want. The following variants are available now: |
· | ahxf-2.1 – compatibility with the XSL Formatter versions 2.1–2.4 from Antenna House, Inc.; |
· | ahxf-2.5 – compatibility with the XSL Formatter v. 2.5 or greater from Antenna House, Inc.; |
· | fop-0.20.1 – compatibility with the FOP v. 0.20.1 or earlier, |
· | fop-0.20.3 – compatibility with the FOP v. 0.20.3; |
· | fop-0.20.4 – compatibility with the FOP v. 0.20.4 or later; |
· | xep-2.5 – compatibility with the XEP v. 2.5 or earlier; |
· | xep-2.7 – compatibility with the XEP v. 2.7; |
· | xep-3.0 – compatibility with the XEP v. 3.0 or later; |
· | w3c – default compatibility with the XSL FO specification 1.0 by WWW Consortium. |
1. | Run the RTF TO XML GUI. |
2. | Click on the Select button in the Select Input File(s) pane of the main form. You will see a file selection dialog. |
3. | Select a file and click on the Select button. The dialog will be closed, the selected item will be shown in the combo box of the Select Input File(s) pane, and the CONVERT button at the bottom of the main form become enabled. |
4. | To start the conversion of selected file to XSL FO file, click the CONVERT button. The log of file conversion process will be shown: |
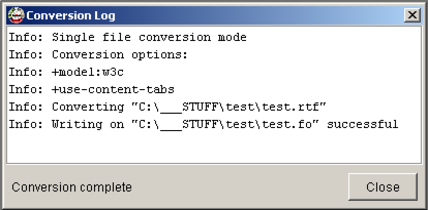
5. | Click the Close button when conversion finishes. |
1. | Run the RTF TO XML GUI and select an RTF file to be converted. |
2. | Click on the Browse button in the Select Output Directory pane. |
3. | Select a directory in the file dialog appearing and click the Select button. |
o | How to convert an RTF file to a pair of XML data file and XSL stylesheet file? |
1. | Run the RTF TO XML GUI and select an RTF file to be converted. |
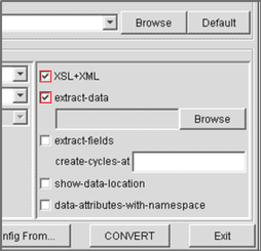
2. | Check the XSL+XML box to the right of Select Conversion Options pane and then check the extract-data box in it |
3. | Run the conversion clicking on the CONVERT button. Two files will be created in this case: |
· | A file with the "xml" extension (XML Data file). It contains all text data found in the converted document. Every text entry is wrapped with nsdc:data entry having a unique value of the id attribute. |
· | A file with the "xsl" extension (XSL Stylesheet file). It contains the document layout and formatting structure. |
4. | To merge these files together as XSL FO, run any XSLT processor on XML data file and pass the XSL stylesheet file as a parameter. |
RTF TO XML allows convert a specially designed RTF document to an XSLT template. When you generate an XSLT template from this document, you receive two different files as the result. One is an XML Data file with variables to be substituted and another one is an XSL Stylesheet file with layout, formatting, and static texts. There are a number of methods used in the design of RTF document for this purpose:
· | Marking an RTF document with specially prepared character styles; |
· | Marking an RTF document with special DOCPROPERTY fields; |
· | Marking an RTF document's tables and lists with a special text sequence to provide cyclic extension of the XML data file. |
The document design process is described below for the Microsoft Word 2000.
1. | Open in Word a document to be designed. |
2. | Open the Format/Style... form in Word and create a custom character style clicking on the New... button: |

In this example, the Style type "Character" was selected and the "Engrave" effect was added to the style. This effect is ignored by RTF TO XML but it allows visually recognize data fields in Word documents. To add the effect, click on the Format button, then click on the Font item of the popup menu, and then check an effect you want. We recommend using the "Shadow", "Outline", "Emboss", or "Engrave" font effects or font animation effects.
If you select the "(underlying properties)" item in the "Based on" list, the custom style will be transparent (this is what just needed here).
3. | Mark a text fragment in the document and change its style to your custom style. |
4. | Repeat Step 3 for all text fragments to be marked with this style. |
If you want to remove a character style from an already marked text fragment, do the following: select the text fragment and apply the "Default Paragraph Font" character style to it.
5. | Save the document in RTF format. |
6. | Prepare an XML document containing a list of styles to be extracted. For the above example, it contains the following: |
<?xml version="1.0" encoding="UTF-8"?>
<styles>
<style name="My style"/>
</styles>
7. | Run the RTF TO XML GUI and select the designed RTF document. Then check the XSL+XML box, click on the Browse button under the extract-data box, and select the style list file prepared on the Step 6 |
8. | Run the conversion. The resulting XML data file will contain only those text fragments whose style is mentioned in the styles list file. Other text fragments will be kept in the XSL stylesheet file. |
1. | Open in Word a document to be designed. |
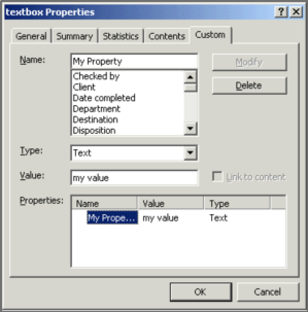
2. | Open the File/Properties form in Word and select the "Custom" bookmark in it: |

3. | Create a new custom property and assign a value for it: |
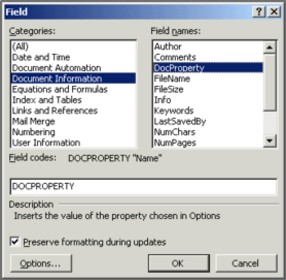
4. | Select a position in the document where you want to insert a template field, open the Insert/Field form, and select the "Document Information" category with the "DocProperty" field name: |
5. | Click on the Options... button, select a name of your custom property, and click on Add to Field button: |
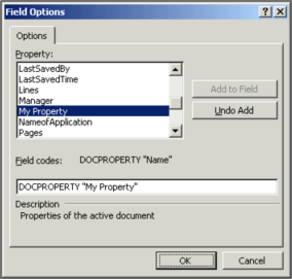
Then click OK. The field will be inserted into the document.
6. | Repeat Steps 4 and 5 for every position in which you want to insert the field. |
7. | Save the document in RTF format. |
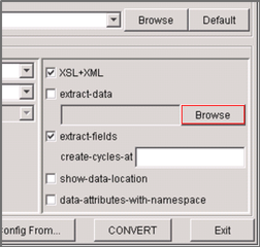
8. | Run the RTF TO XML GUI and select the designed RTF document. Then check the XSL+XML and extract-fields boxes: |
9. | Run the conversion. The resulting XML data file will contain nsdc:field elements having the name attribute referring to the value of the corresponding DOCPROPERTY attribute. If a field with the same name was inserted in many places of RTF file, only one instance of nsdc:field is created in XML, and the content of this field is referred in XSL stylesheet in all places where the field was inserted in the RTF document. |
A point for cyclic expansion is a place in RTF document where an unlimited number of entries will be later inserted. Two types of cycles are allowed now: list-item cycles and table-row cycles. The process of insertion of cyclic expansion points is the following:
1. | Open in Word a document to be designed. |
2. | Create a list or/and a table to be expanded. |
3. | Write down a marker (a special text sequence) in points of the document where expansion is planned. You can use any combination of symbols as a cycle marker, but just the same sequence in all points of cyclic expansion planned. |
4. | Save the document in RTF format. |
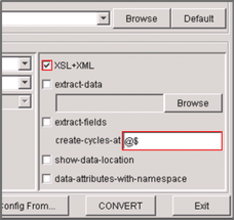
5. | Run the RTF TO XML GUI and select the designed RTF document. Then check the XSL+XML box and write down the text marker sequence near to "create-cycles-at" label: |
6. | Run the conversion. The resulting XML data file will contain nsdc:table-cycle and nsdc:list-cycle elements (one element per a cycle point found in the converted document). |
The cyclic expansion procedure is described in the RTF TO XML User's Guide.