
RTF TO XML
User’s Guide
Version 5.2.1
For information on commercial use, support, and version updates please visit:
Introduction •
Scope •
Usage •
Features •
Limitations •
References •
GUI Conversion •
Run GUI Conversion •
Batch Conversion •
Command Line Conversion •
Single Conversion of RTF File •
Batch Conversion of Multiple RTF Files •
Recursive Conversion of RTF files •
Description of RTF TO XML Options •
Common Options •
Compatibility Model •
Advanced Options •
Template Preparation Options •
XML Output Options •
Using the API •
Using a Conversion Task •
Conversion of an Individual File •
Low-level Conversion •
Conversion to XML Templates •
Description of Data Extraction Algorithm •
Composing Cycles •
Data Namespace •
Configuring RTF TO XML •
Configuring the RTF Parser •
Multilingual Support •
Substituting Fonts •
Finding the most matching substitution rule •
Selecting the font name for rendering tabs •
Composing the family attribute while writing to XML FO •
Default font substitution rules •
Configuring Picture Plug-ins •
Configuring Output Plug-ins •
Specifying User Preferences •
Implementation Notes •
List of Parsed RTF Control Words •
Compatibility Notes •
Interpreting of continuous section breaks •
Horizontal positioning of tables •
The RTF TO XML converter is designed for conversion of Rich Text Format (RTF) files to well-formed Extensible Markup Language (XML) documents according to the Extensible Stylesheet Language Formatting Objects (XSL FO) specification.
The RTF TO XML allows splitting an XML FO file into an XSL template containing formatting and an XML file containing textual data. A range of criteria for data extraction can be used during conversion. Insertion of simple cycles is also allowed.
The current document describes the version 5.2.1 of RTF TO XML. This version is based on a new RTF parsing solution — the Novosoft RTF DOM Builder.
The converter can be called via Graphics User Interface (GUI), from the command line (the ru.novosoft.dc.rtf_to_xml.Convert class provides this functionality), or via API requests. The usage of RTF TO XML is described in the rest of the current document.
Installation guidelines are described in the readme.txt file supplied with the distribution.
Using GUI under Linux requires X11 support.
Different versions of RTF TO XML have different usage limitations:
Evaluation version limitations
· | Text content is stained with characters occasionally replaced with punctuation marks; |
· | In prepare-template mode, some text entries are not moved to XML data file. |
Simple license limitations
· | No batch and recursive conversion; |
· | No open API. |
Server and Site license limitations
· | Conversion to templates is optional. |
Conversion methods
RTF TO XML converts a RTF document (for example, MS Word 2000 document saved as Rich Text Format) into XSL FO format. The converter supports two conversion types: the conversion to well-formed XML according to XSL FO specification and the conversion to an XML template consisting of two files: XSL template and XML data (see Section 5).
RTF TO XML supports the following RTF specifications (changes from the version 2.2.2 are highlighted):
Page formatting support
· | Page setup options: margins, page size; |
· | Page headers and footers of all types; |
· | Section breaks of all types (continuous section breaks are supported in compatibility with Antenna House XSL Formatter 2.5 and XEP 3.0); |
· | Custom restart of section page numbers; |
· | Footnotes: custom and Arabic numbering labels, custom footnote separators; |
· | Watermarks (document background). Since version 3.0, the support of background images is temporary disabled; |
· | Document columns with identical widths and gaps (the XSL FO specification does not support columns with different widths and different gaps between columns); |
· | Paragraph pagination: widow/orphan control, keep together, keep with next; |
· | Page breaks before or after a paragraph. |
Text formatting support
· | Font family and size, superscript and subscript; |
· | Font style and weight (bold, italic, underline, etc.); |
· | Font color and background color; |
· | Cell, paragraph, and text color shading (without patterns); |
· | Paragraph alignment and margins; |
· | Paragraph line spacing; |
· | Space before and after a paragraph; |
· | Lists of all formats; |
· | Commonly used special RTF symbols; |
· | Preservation of white spaces; |
· | Line breaks. |
Tabs support
· | The rendering is applied for calculating true position of text with tabs; |
· | Multiple tabs of the “center” or “left” type in the first line and one tab of the “right” type in the last line of the paragraph are allowed; |
· | Two tabs conversion methods are allowed on your choice (fo:leader with leader-pattern=”space” and with leader-pattern=”use-content”); |
Miscellaneous
· | Full implementation of tables (except slanted borders); |
· | Height of table rows and vertical alignment of text in table cells; |
· | Last page number field; |
· | Pictures of any graphic format provided with RTF Specification 1.6; |
· | Picture conversion plug-ins; |
· | Support of non-grouped textboxes; |
· | Multilingual support (23 RTF code pages and 17 font character sets are supported); |
· | Links (e.g. in table of contents) and hyperlinks; |
· | Track changes support (is temporary turned off because of improvements planned). |
· | Tabs rendering limitations are the following: |
o | Rendering is applied to standard fonts known in Java; |
o | A right tab must close a paragraph; |
o | Only one right tab per paragraph is allowed; |
o | Mixing of underlined tabs and fonts is forbidden. |
If graphics could not be initialized, tabs rendering is turned off. So, if X11 is not supported under Linux, tabs rendering will be forbidden.
· | RTF format supports different column gaps (e.g. 12 pt between first and second column and 24 pt between second and third column) but XSL FO does not. So "column-gap" is set equal the last encountered gap width. |
· | Watermark / background image cannot be resized in XSL FO format (while this is possible in RTF). |
For information on commercial use, support, and version updates please visit
XSL FO specification:
XSL FO processors:
X11 support for Linux:
ImageMagick:
FOP:
http://www.apache.org/fop/
Using RTF TO XML GUI requires Java graphics components to be supported. For example, to run GUI under Linux X11 support is required.
To start the GUI, run
rtf_to_xml.bat
from RTF TO XML home directory. The main window of the GUI looks as follows:
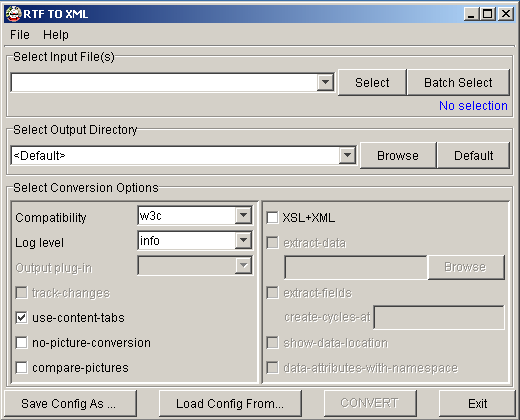
The Select Input File(s) pane provides selection of rtf-file to be converted. To do this, click on the Select button and select an rtf-file in an ordinary file selection dialog appearing. After that, the CONVERT button becomes enabled and allows the conversion to XSL FO.
The Select Output Directory pane allows select a directory to store the results in. The <default> selection means the output to be stored near the input (in the same directory of the input file). A name of output file is composed from the name of input file with changing its extension to “.fo” (in XSL+XML mode, two output files are created for every input file, namely an XML data file with the “.xml” extension and an XSL stylesheet file with the “.xsl” extension).
The Select Conversion Options pane shows the most important options for the conversion. It is divided into two parts: the left part contains common user options and the right part contains options useful for splitting an output into an XML data file and XSL stylesheet file.
The Compatibility combo box allows select a compatibility model to be used while conversion. The following variants of compatibility are supported now:
· | ahxf-2.1 – compatibility with the XSL Formatter versions 2.1–2.4 from Antenna House, Inc.; |
· | ahxf-2.5 – compatibility with the XSL Formatter version 2.5 or greater from Antenna House, Inc.; |
· | fop-0.20.1 – compatibility with the FOP version 0.20.1 or earlier, |
· | fop-0.20.3 – compatibility with the FOP version 0.20.3; |
· | fop-0.20.4 – compatibility with the FOP version 0.20.4 or later; |
· | xep-2.5 – compatibility with the XEP version 2.5 or earlier; |
· | xep-2.7 – compatibility with the XEP version 2.7; |
· | xep-3.0 – compatibility with the XEP version 3.0 or later; |
· | w3c – default compatibility with the XSL FO specification 1.0 by WWW Consortium. |
The Log level combo box allow select one of three logging levels:
· | info – logging information messages to the screen log while conversion; |
· | normal – logging messages to the screen log and to the file with “.log” extension; |
· | full – logging more messages than in normal level. Two log files are created in this case: “.log” file contains all messages and “.log0” file contains rtf commands skipped while conversion. |
For normal or full logging, log files are stored near the conversion results.
The Output plug-in combo box allows select a plug-in command to be applied after successful conversion of an rtf-file. It is disabled if no active output plug-ins recognized (see Section 4.e for more details).
The options on the right of the options pane are used for a special conversion in the “prepare-template” mode. When the XSL+XML box is checked, this mode is turned on and other options become enable for change (see Section o for more details).
The buttons at the bottom of the main form provide the following actions:
· | Save Config As … button allows save the current configuration of GUI (selected options, history of selected files and directories) to a file. It starts an ordinary file selection dialog. |
· | Load Config From … button allows load a GUI configuration from a file. The loaded configuration is copied to the current configuration. |
· | CONVERT button starts the conversion task in a separate window. |
· | Exit button closes the RTF TO XML GUI program. |
When a file is successfully converted, its path is added to the top of the file conversion history list. You can easy select a file converted earlier just opening the file history combo box in the Select Input File(s) pane. The selected directories are also saved in the history list. The GUI program remembers last 10 files and directories used.
The Batch Select button in the Select Input File(s) pane allows select all rtf files in a directory for a conversion. The following dialog appears:
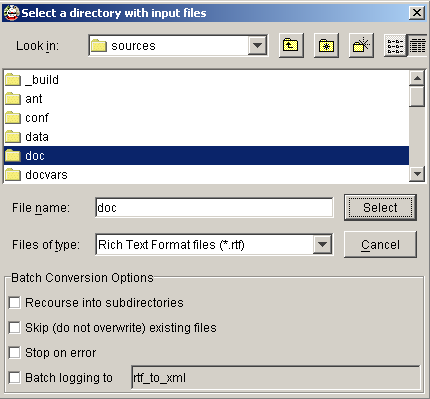
You can select a directory containing rtf-files to be converted and specify additional batch conversion options meaning the following:
· | Recourse into subdirectories: All rtf-files in a selected directory and in all its subdirectories will be converted. Conversion results are stored near the input files or relatively to the output directory with the same directory tree structure as the input directory tree. |
· | Skip (do not overwrite) existing files: In this mode, the RTF TO XML converts only those files which have not been converted yet; already existing target files remain untouched. |
· | Stop on error: In this mode, an error during conversion a file interrupts the run and stops conversion of remaining files in the list. |
· | Batch logging to: If this mode is selected, the conversion log will be written to a single file of the specified name and the “.log” extension. The log file is stored in the selected input directory or in the output directory if it is specified. This option has effect if the log level is Normal or Full. |
Note: Depending on the type of the RTF TO XML license, batch conversion can be unavailable. In this case, you will be able to convert only a single file per run.
To convert an RTF file to XSL FO format from command line, open the console (DOS) window and run the following command:
rtf_to_xml_cmd rtf-file
Here rtf-file is a path to an RTF file to be converted. The path can be either absolute or relative to the current directory. The destination XML FO file will be created with the “.fo“ extension in the same directory where the rtf-file is located. The default conversion rules meet W3C recommendations, but existing rendering tools can have differences in XSL FO specification. So, to satisfy the input specification of a specific renderer, the corresponding compatibility option must be used while running a conversion to XML FO. For example, to provide compatibility with the FOP-0.20.3, run the following command:
rtf_to_xml_cmd -o fop-0.20.3 rtf-file
You can also use the –d option to specify a destination directory where the FO file will be stored in. For example, the following command converts “c:\rtf\sample.rtf” and stores the resulting file as “c:\fo\sample.fo”:
rtf_to_xml -o fop-0.20.3 c:\rtf\sample.rtf –d c:\fo
The converter allows batch processing of many RTF files using a single command:
rtf_to_xml_cmd rtf-file1 rtf-file2 …
You can use wildcards in file names. For example, the following command converts all RTF files in the current directory and saves the results with the “.fo“ extension in the same directory:
rtf_to_xml *.rtf
You can also use the –d option to specify a destination directory where the FO files will be stored in. For example, the following command converts all RTF files in the current directory and creates the resulting FO files in the subdirectory fo:
rtf_to_xml_cmd *.rtf –d fo
You can also specify that the source directory should be replaced with the destination directory during a conversion. The –s option is used for this purpose. For example, the following command converts all RTF files in two subdirectories of the rtf directory and stores the results in respective subdirectories of the fo directory:
rtf_to_xml_cmd rtf\dir1\*.rtf rtf\dir2\*.rtf –s rtf –d fo
If the source directory is not specified, but the destination directory is specified, the location of the source directory is set to the directory of the first file in the conversion list. If some files in the list do not belong to the source directory, conversion results for these files will be kept in the respective source directories.
The recursive processing allows convert RTF files in specified directories and in all their subdirectories. To achieve this, use the –r option. We recommend enclosing the template name for converted RTF files in double quotes to prevent automatic wildcard expansion provided by some operating systems. In the example below, all RTF files in the current directory and in all of its subdirectories are converted:
rtf_to_xml_cmd –r "*.rtf"
Another example provides conversion of all RTF files in the subdirectory tree starting from the rtf subdirectory of the current directory. The results will be stored with “.fo“ extension in the tree of the same structure, but created in the fo subdirectory:
rtf_to_xml_cmd –r "rtf\*.rtf" –d fo
The RTF TO XML provides many options and many ways to set them. All options can be divided into the following categories:
· | Common Options are specified in the command line only; |
· | Core Options are specified in the RTF TO XML configuration file only. They cannot be modified from command line (see the "conf/nsdc.properties" file for a more detailed description); |
· | User Options are specified in many ways. Their default values can be specified in the RTF TO XML configuration file. You can override the defaults from the command line or using a file of options loaded with the –o option. |
Common options have a special syntax described in Section l. User options have the following syntax:
· |
|
· |
|
· |
|
Here the "key" is the option name, and the "value" is the option value.
During conversion, the values of options are used in the following order:
1. | The RTF TO XML configuration file "conf/nsdc.properties" is loaded at first. Core options and default values of user options are set here. |
2. | Command line options are processed from the left to the right. A new entry of an option overrides its previous value. An exception is the "font-substitution" option, for which a new value means that a file of font substitutions will be loaded in addition to already specified font substitutions. |
3. | When options are loaded from a file, the processing order of these is undefined. |
The following common options can be used only in the command line:
· | -h or --help option prints the help info with description of common options and stops the processing; |
· | -i option turns on the indentation in the output files. This option takes no effect on XML data files in templates preparation mode because XML data is always produced with indentation; |
· | -u option applies GUI preferences to a command line conversion. This option is introduced since version 3.2. It allows starting a command line conversion with options selected in RTF TO XML GUI; |
· | -d directory option specifies the destination directory root where the output file(s) will be stored in; |
· | -s directory option specifies the source directory root. It works in conjunction with the –d option. When both options are specified, the source directory root is replaced with the destination directory root when determining the paths of output files. If the destination directory is specified but the source directory is not, the source directory is taken from the path to the first file in the list of source files. This option is used only during batch conversion; |
· | -r option allows recursive processing of subdirectories. This option is used only during batch conversion; |
· | -S option turns Skip Mode on. In the skip mode, the RTF TO XML converts only those files from the conversion list, which were not yet converted. This option is used only during batch conversion; |
· | -E option turns the Stop on Error mode on. It interrupts the whole conversion procedure if an error occurs during conversion of one of files. This option is used only during batch conversion; |
· | -o path option loads options/settings from a file specified in the path. This option can be used for loading compatibility options. For example, -o xep-2.7 option loads compatibility options for XEP-2.7. Files of compatibility options are stored in the “conf” subdirectory of the RTF TO XML home directory and have the “.opt” extension. You can prepare your own file of options and type its path as the value for this option. The default option file extension “.opt” can be omitted. If a file is located in the “conf” subdirectory of the RTF TO XML home, its name (and, maybe, extension) is sufficient to find it. If the options file was not found at the path specified by this option, RTF TO XML then looks for that file in the “conf” subdirectory. Options in a file should be listed using the key=value syntax. Default values of options are specified in the conf/nsdc.properties file; |
· | -vN option sets the logging level (from 0 to 5): |
o | -v0 no logging, |
o | -v1 info logging (log information messages to the console), |
o | -v2 silent normal logging (log information, warning, and error messages to the ".log" file), |
o | -v3 normal logging (log information, warning, and error messages both to the console and to the ".log" file), |
o | -v4 silent full logging (log information, warning, error, and debug messages to the ".log" file; messages on unrecognized commands to the ".log0" file), |
o | -v5 full logging (log information, warning, and error messages to the console; log information, warning, error, and debug messages to the ".log" file; messages on unrecognized commands to the ".log0" file). |
The default logging level is 1. If the logging level is greater than 1, a log file is created for each converted file (with the same name and a ".log" extension) and is saved in the same directory with the conversion results. In batch-logging mode (see Section n) with logging level greater than 1, a single "rtf_to_xml.log" file is created in the "log" subdirectory of the RTF TO XML home directory. For ordinary cases we recommend using logging levels from 1 to 3.
Since version 3.2, a number of compatibility options were reduced to an only option, the model option. A list of possible values of this option and their meanings is specified in Section f in the description of Compatibility option.
For convenience and for backward compatibility with elder versions of RTF TO XML, the files of compatibility options remain the same, but they now contain the model option only. So, you can specify a compatibility model in two ways (for FOP-0.20.4 compatibility example): use either
-o fop-0.20.4
or
-model:fop-0.20.4
in command line.
The meaning of compatibility settings is specified in the “data/options.xml” file. Compatibility specifics is described in Section 4.h.
In this section we describe miscellaneous user options providing additional conversion abilities. The command line syntax is used here:
· | -output-plugin:name option specifies a name of output plug-in configuration file to be applied after conversion of rtf-file (see Section 4.e for more details); |
· | -track-changes option generates document with track changes shown with a strikethrough font. Default behavior is `no track changes’. In this case deleted and revised text is ignored [the track change support is revised since version 3.0. It is not functioning yet]; |
· | -use-content-tabs option turns on using of “use-content” type leaders in conversion of tabs. Using of content tabs provides more exact tabs alignment but if a text before tab goes out of the tab position it will disappear. So, by default the “space” type leaders are used; |
· | -no-picture-conversion option is used for disabling picture conversion plug-ins in this run. The default behavior of the converter is to apply picture conversion plug-ins if specified (see Section 4.d); |
· | -compare-pictures option is used for reducing a number of output pictures if a converted file contains many identical pictures; |
· | -batch-logging option switches log output of the run to the "log/rtf_to_xml.log" file (the "log/rtf_to_xml.log0" file is also created in a full logging mode). If the destination directory is specified, the log file(s) will be stored in it. This option is used only during batch conversion; |
· | -log-name:template option allows change the name of log file in batch logging mode. The default value of the log name is "rtf_to_xml". This option is used only during batch conversion; |
· | -font-substitution:XML-file option loads font substitution entries from the specified XML file. At first, RTF TO XML looks for this file at the specified location, and if the file is not found, it tries to load it from the "data" subdirectory of the RTF TO XML home directory. The "fonts/default.xml" file is loaded before processing of all other font substitution files (see Section 4.c). |
If the supplied version of RTF TO XML provides template preparation, the options described in this section can be used (see Section 5 for more details):
· | -prepare-template option switches to the template preparation mode. In this mode, an output XML FO file is split into two files: an XSL template containing XSL FO formatting and XSL transformation rules, and an XML data file containing data fields. If the value of this option is not "true", other template preparing options are ignored! |
· | -extract-data option provides extraction of all text data found in the RTF file. |
· | -extract-data-with-style:XML-file option loads style names from the specified XML file. At first, RTF TO XML looks for this file at the specified location, and if the file is not found, it tries to load it from the "data" subdirectory of the RTF TO XML home directory. The XML file must contain the elements |
<style name="style name">
This option has higher priority than the previous one. If style names are specified, the text data prepared in the RTF file with the specified styles will be extracted;
· | -extract-fields option turns on extraction of data from fields of DOCPROPERTY type; |
· | -data-attributes-with-namespace option turns on the output of data attributes with the nsdc: prefix. Otherwise, all data attributes will have no prefix; |
· | -show-data-location option switches on writing optional location information to the data file (see Section t for more details); |
· | -create-cycles-at:marker option specifies a marker to be used for recognizing cycles in RTF files. If the marker is empty, the cycles recognition is switched off. |
The XML output options control the output to XML. They specify extensions of XML files to be produced and formatting properties for the produced files. They are shown here using command line syntax, with values used by default:
· | -fo-file-extension:.fo option specifies the extension of XML FO file; |
· | -fo-template-extension:.xsl option specifies the extension of XSL template file; |
· | -fo-data-extension:.xml option specifies the extension of XML data file; |
· | -xml-indent:4 option specifies the indent value used in indented serialization to XML; |
· | -xml-line-width:72 option specifies preferred line width used in serialization to XML; |
· | -encoding:UTF-8 option sets the encoding name to be used for XML output. |
The RTF TO XML API consists of two packages: ru.novosoft.dc.core and ru.novosoft.dc.rtf_to_xml. The first package contains public classes and interfaces used in any conversion. The second package contains RTF TO XML-specific classes.
In all conversions, an instance of ru.novosoft.dc.rtf_to_xml.RTF_TO_XMLContext class is used. It specifies RTF TO XML conversion options and provides the converter with necessary objects, such as ru.novosoft.dc.core.PicturePool and ru.novosoft.dc.core.CommonLogger.
There are 3 levels of using the RTF TO XML API:
1. | The top level provides creation of a Conversion Task, supporting the same abilities as the command-line run of RTF_TO_XML; |
2. | The medium level allows conversion of an individual RTF file using a number of service methods; |
3. | The low level provides conversion from an RTF input stream with construction in memory of a vector of documents conforming to W3C DOM Level 2 model (http://www.w3.org/DOM/DOMTR). |
To convert a number of files via API requests, do the following:
1. | Create an instance of ru.novosoft.dc.rtf_to_xml.ConversionTask class passing the system log stream to it (an instance of PrintStream). For example, the System.out can be transferred. |
2. | Prepare a list of files to be converted using the addPath(path) method of the conversion task as many times as required. Every path added using this method must be either a file path or a directory path ended with a file mask containing wildcards ("*" and "?" wildcards are allowed in the mask). |
3. | Set properties of the conversion task using methods provided by this class. For example, to set recursive conversion, the useRecursion() method is used. |
4. | To set an option for the conversion task, you must get the RTF_TO_XMLContext of this task via the context() method and set the value of the required option by the setOption(key, value) method. |
5. | You can also load options from a file using the loadOptions(filename) method of RTF_TO_XMLContext. |
6. | When all preliminary work is finished, call the convert() method for the conversion task. |
Let us examine the following command line run:
rtf_to_xml_cmd rtf\dir1\*.rtf rtf\dir2\*.rtf –s rtf –d fo –o fop-0.20.4
The example below prepares and executes the conversion task matching this run:
ConversionTask task = new ConversionTask(System.out);
task.addPath("rtf\dir1\*.rtf");
task.addPath("rtf\dir2\*.rtf");
task.setSourcePath("rtf");
task.setDestinationPath("fo");
task.context().loadOptions("fop-0.20.4");
task.convert();
The static methods of the ru.novosoft.dc.rtf_to_xml.RTF_TO_XML class provide conversion of individual files. They differ in abilities of controlling the conversion. We describe them in the order of increasing complexity.
1. | To convert an individual file with default settings, use the method |
RTF_TO_XML.convert(filename, indent);
Here filename is a name of file to be converted and indent is the boolean value specifying whether the XML output will be indented or non-indented.
2. | To convert an individual file with default settings and the specified log level, use the method |
RTF_TO_XML.convert(filename, logLevel, indent);
The logLevel value is an integer in the range from 0 to 5. Symbolic constants from ru.novosoft.dc.core.NSDCContext class can be used as log levels instead of the numeric value.
3. | If you want to specify some conversion options, you must first create an instance of ru.novosoft.dc.core.RTF_TO_XMLContext class. After that, you can set the required options and then call the appropriate conversion method. For example, to produce conversion results compatible with FOP 0.20.4, do the following: |
RTF_TO_XMLContext context = RTF_TO_XMLContext.prepareContext(System.out);
context.setOption("model", "fop-0.20.4");
RTF_TO_XML.convert(filename, context, indent);
4. | If you want to load GUI preferences, use the following method of the RTF_TO_XMLContext before the conversion of rtf-file: |
context.loadUserPreferences();
5. | In more complex cases, you can specify a name of the output file (it will be used as the template name, appropriate extension(s) will be added during conversion); create a conversion logger, conversion handler, and a picture pool. For example, say you want to convert the file "c:\My documents\sample.rtf", store the conversion result in the FO file with the name "c:\fo\result", and create the log file with the same name. The following code implements this task: |
String source = "c:\\My documents\\sample.rtf";
String target = "c:\\fo\\result";
RTF_TO_XMLContext context = RTF_TO_XMLContext.prepareContext(System.out);
CommonLogger logger = context.newLogger(target, NSDCContext.NORMAL_LOG);
RTF_TO_XML.convert(source, target, context, logger, new NSDCHandler(context),
indent);
logger.close();
An instance of the NSDCHandler class provides a conversion handler based on Apache Xerces XMLSerializer and the implementation of W3C DOM Level 2 model (http://xml.apache.org/xerces2-j/index.html).
You can prepare your own handler, implementing the ru.novosoft.dc.core.ConversionHandler interface.
The low-level conversion method of the ru.novosoft.dc.rtf_to_xml.RTF_TO_XML class provides the conversion at the most abstract level. It parses the input stream containing RTF commands and prepares one or two documents in the memory conforming to W3C DOM Level 2 model (http://www.w3.org/DOM/DOMTR). The number of constructed documents depends on the value of the "prepare-template" option in RTF_TO_XMLContext instance. If the value is not "true", a single XML FO document is created. Otherwise, two documents are prepared: the first document contains a template and the second one contains extracted data.
This method is specified as follows:
static Document[] convert(java.io.InputStream in,
ru.novosoft.dc.rtf_to_xml.RTF_TO_XMLContext context,
ru.novosoft.dc.core.CommonLogger logger,
ru.novosoft.dc.core.PicturePool pool,
org.w3c.dom.DOMImplementation handler);
The RTF TO XML converter allows split an RTF file into two parts: one part contains XSL FO formatting and another part contains text data extracted from the RTF file. We call this ability "conversion to XML template".
The conversion is controlled with the prepare-template option. If this option has the true value, two XML files will be created: an ".xsl" template file containing XSL FO formatting and ".xml" data file containing data entries extracted from the RTF file. The template file will contain the XSL instructions for data inclusion and the data file will contain all necessary data elements. To merge these files, you will need to transform the XML data file using an XSLT processor and passing the XSL template file as a parameter.
The set of data entries extracted from RTF file depends on the values of template preparation options and their combinations (see Section o):
· | If the extract-data option has the true value and the extract-data-with-style option is undefined, plain text entries and field results are extracted as nsdc:text elements. |
· | If the extract-data-with-style option is specified, its value is a path to the XML file containing styles to be extracted. In this case, the plain text entries and field results having styles specified in the XML file will be extracted as nsdc:text elements. |
· | If the extract-fields option has the true value, the fields of DOCPROPERTY type are processed in a special way: an nsdc:field element is created for every name of DOCPROPERTY field found in the RTF file. If a DOCPROPERTY field with the same name appears many times in the RTF file, the unique nsdc:field element will be created in the data file and all data inclusion instructions will refer to it. |
· | If the data-attributes-with-namespace option has the true value, the nsdc: prefix will be specified for all attributes belonging to the "nsdc" namespace. Otherwise, attributes of "nsdc" elements will have no prefix. |
· | If the show-data-location option has the true value, nsdc:text elements will be accompanied with the style attribute and with optional location attributes, namely in-list, in-table-level, row, and column. If a text entry belongs to a list, the in-list attribute specifies the position of the text in the list: either "label" or "item". If a text entry belongs to a table cell, three attributes will be specified: |
o | The in-table-level attribute will have the value of table nesting level (1 for the upper level table, 2 for a nested table, 3 for a table nested in a nested table, and so on); |
o | The row attribute will contain a row coordinate in the table (1 for the first row, 2 for the second row, and so on). If the cell where the text is located has vertical spans, the value of the attribute will be a range (e.g. row="2-3"); |
o | The column attribute will contain a column coordinate in the table (1 for the first column, 2 for the second column, and so on). If the cell where the text is located has horizontal spans, the value of the attribute will be a range (e.g. column="1-3"). |
A list text inside a table will have all four location attributes specified. An ordinary text (outside of lists and tables) will have no location attributes.
The data extraction algorithm allows composing cycles using specially marked entries in the RTF file. This ability is controlled with the create-cycles-at option. To prepare cycle points in the RTF file, you must mark them with a unique text sequence and then set this sequence as a value for this option.
Two variants of cycles are allowed in the RTF file:
· | Table row cycle. A row must consist of cells without vertical spans and the first cell should contain the marker sequence only. Other cells can contain any raw text; |
· | List item cycle. A text of list item must contain the marker sequence only. |
The preparation of cycles is shown in the following example:
|
|
|
|
|
|
|
|
|
|
|
|
|
|
|
|
|
|
|
|
· | Simple list item |
· | @$$ |
This example contains 2 cycle points marked with “@$$”. When an XSL template is created and the value of the option create-cycles-at is equal to “@$$”, two cycles are generated in the template file and two cycle elements are specified in the data file as nsdc:table-cycle and nsdc:list-cycle elements. Conversion of this example with options –prepare-template and –create-cycles-at:@$$ produces the following XML data file:
<?xml version="1.0" encoding="UTF-8"?>
<nsdc:data xmlns:nsdc="http://www.rtf-to-xml.com/NSDC">
<nsdc:table-cycle cell-count="5" id="1">
<!-- Insert rows here. Every row consists of 5 cells -->
</nsdc:table-cycle>
<nsdc:list-cycle id="1" label="·">
<!-- Insert list items here -->
</nsdc:list-cycle>
</nsdc:data>
To insert entries at cycle points, you must replace the comments with corresponding cycle elements in the data file following the syntax described in Section v. In the sample below, two table rows and two list items are inserted:
<?xml version="1.0" encoding="UTF-8"?>
<nsdc:data xmlns:nsdc="http://www.rtf-to-xml.com/NSDC">
<nsdc:table-cycle cell-count="5" id="1">
<nsdc:row>
<nsdc:cell no="1">Cell 1</nsdc:cell>
<nsdc:cell no="5">Cell 5</nsdc:cell>
<nsdc:cell no="3">Cell 3</nsdc:cell>
</nsdc:row>
<nsdc:row>
<nsdc:cell no="2">Cell 2</nsdc:cell>
<nsdc:cell no="3">Cell 3</nsdc:cell>
<nsdc:cell no="4">Cell 4</nsdc:cell>
</nsdc:row>
</nsdc:table-cycle>
<nsdc:list-cycle id="1" label="·">
<nsdc:item>Item 1</nsdc:item>
<nsdc:item label="¨">Item 2</nsdc:item>
</nsdc:list-cycle>
</nsdc:data>
After merging the template with data and processing it with a FO renderer, the result will look as follows:
|
|
|
|
|
|
|
|
|
|
|
|
| ||
|
|
| ||
|
|
|
|
|
· | Simple list item |
· | Item 1 |
¨ | Item 2 |
The root element of XML data file is the nsdc:data. It contains elements of the following types:
text | field | table-cycle | list-cycle
text ::= <nsdc:text id=string [style=style-name] [in-list=list-location]
[in-table-level=number row=number-or-range
column=number-or-range]> plain-text </nsdc:text>
list-location ::= "label" | "item"
field ::= <nsdc:field name=string> plain-text </nsdc:field>
table-cycle ::= <nsdc:table-cycle id=string cell-count=number>
table-cycle-body </nsdc:table-cycle>
list-cycle ::= <nsdc:list-cycle id=string label=string>
list-cycle-body </nsdc:list-cycle>
Here the id attribute contains a unique identification number for an entry referred within the template; fields are referred using their names (names of corresponding document properties); the style attribute contains a name of rtf-style used for; and the label attribute contains the default value of list-item label.
The body of table cycle is composed manually. It must confirm with the following syntax:
table-cycle-body ::= row ...
row ::= <nsdc:row> cell ... </nsdc:row>
cell ::= <nsdc:cell no=number> plain-text </nsdc:cell>
The no attribute must contain the cell index (cells are counted from 1). It is not necessary to spevify all cells in a table row. Omitted cells will be empty.
The body of list cycle is composed manually. It must confirm with the following syntax:
list-cycle-body ::= item ...
item ::= <nsdc:item label=string> plain-text </nsdc:item>
The label attribute is optional. If it is absent, the default value of label specified in the nsdc:list-cycle will be used.
The RTF TO XML uses a number of external data files while conversion. They are usually stored relative to the RTF TO XML home directory. The home directory path is calculated in the following way:
7. | If the “rtf_to_xml.home” system property is specified, the home directory is set to the value of this property. |
8. | Otherwise, the home directory is set to the first path in the list of CLASSPATH variable. |
It is important how the RTF TO XML search files. The search algorithm depends on a path to search:
2. | If a path starts with the "file:" prefix, the prefix (and maybe a slash “/” after the prefix) is trimmed and the resulting path is used for file search. |
3. | If a path starts with the slash “/”, it is interpreted as a path relative to the RTF TO XML home directory. If the search in RTF TO XML home fails, the RTF TO XML attempts to search the file in the path as is. |
4. | In other cases, the file is searched at the specified path. If the search fails, the RTF TO XML attempts to search this path relative to the RTF TO XML home directory. |
After recognizing a home directory, RTF TO XML load an RTF TO XML configuration file, which contains other configuration properties and default settings for all user’s options. This file is usually stored in the “conf” subdirectory of the RTF TO XML home directory under the "nsdc.properties" name. You can override this setting if specify the "rtf_to_xml.configuration" system property. In this case, the configuration file will be loaded from the location specified in the value of this property.
Since version 3.2, the home directory is specified via “rtf_to_xml.home” system property in the java run. If you want specify or change any of them, you can either correct rtf_to_xml.bat (rtf_to_xml.sh) file and specify a system property with –D key just before the ru.novosoft.dc.rtf_to_xml.Convert parameter or use the System.setProperty method in Java. The same correction method can be applied to the rtf_to_xml_gui.bat (rtf_to_xml_gui.sh) file.
The RTF TO XML configuration file contains different groups of properties having the key=value syntax. The following groups are used in RTF TO XML:
1. | The properties starting with the "system." prefix are system properties. A system property is set only if it was not previously specified in some other way. The "system." prefix in a property key is removed while setting. Don’t try to specify the “rtf_to_xml.home” and "rtf_to_xml.configuration" properties, because they are tested before loading the configuration file. |
2. | The properties starting with the "encoding." prefix specify the mapping of RTF Code Page numbers and RTF Font Charset numbers to Java Encoding names (see Section b). |
3. | The properties starting with the "nsdc." prefix specify the RTF TO XML core options (main paths and extensions of some configuration files). Their values are never changed after loading the configuration, but when loading these can be overridden by options having the "rtf_to_xml." prefix. The "nsdc." prefix is removed while setting a value for a core option. |
4. | The properties starting with the "rtf_to_xml." prefix specify default values for user options of the RTF TO XML and for overriding core options. The "rtf_to_xml." prefix is removed while setting a value for a user option. |
The RTF Parser used in RTF TO XML is configured with system properties starting with the "rtf.parse." prefix. The following parser properties can be specified:
· | rtf.parse.by-specification is a flag (true/false). It specifies the method of recognizing some cell padding commands in RTF file (some command names were misplaced in Microsoft implementation of RTF and do not conform to the RTF Specification 1.6). The default value is "false". It provides compliance with MS Word. |
· | rtf.parse.ignore-case is a flag (true/false). While parsing an RTF file, the parser recognizes command names using exact match (case-sensitive). Set the "true" value for this property if case-insensitive comparison is required. |
· | rtf.parse.conversion-density specifies the resolution of pictures prepared with picture conversion plug-ins. The default density is 100 DPI (dots per inch). |
The RTF Specification allows using of many character-encoding tables in one RTF file. Two ways of encoding control are provided within the specification: Code Pages and Font Charsets. Code Page numbers are used to specify how raw non-ASCII characters must be converted to Unicode. Font Charset numbers specify encoding of fonts used in RTF file.
To provide proper conversion of RTF data to Unicode, it is necessary to specify a mapping of RTF Code Page numbers and RTF Font Charset numbers to respective Java Encoding names. The default mappings for 23 RTF Code Page numbers and 17 RTF Font Charset numbers are coded in the RTF Parser. You can extend or redefine many of these mappings in the RTF TO XML configuration file with the "encoding." properties.
The property encoding.codepageN=encoding specifies the mapping of an RTF Code Page number to a Java Encoding name.
The property encoding.charsetN=encoding specifies the mapping of an RTF Font Charset number to a Java Encoding name.
To set these mappings properly, you should be familiar with the RTF Specification 1.6.
In RTF to XML conversion, some font name replacements could be necessary. There are two major items for such replacements:
1. | For rendering tabs, a name of font in the RTF file should be associated with a name of font in Java environment and |
2. | A name of font in the RTF file should be associated with a list of font family names to be written to XML FO. |
The RTF TO XML allows loading user-defined substitution rules, which provide the above-mentioned replacements of font names. These rules are specified in an XML file and are loaded using the font-substitution option. The value of this option is the path to an XML file to be loaded. T At first, RTF TO XML looks for this file at the specified location, and if the file is not found, it tries to load it from the "data" subdirectory of the RTF TO XML home directory. The syntax of font substitution file is as follows:
<font-substitution>
<font template="text" name="text" family="text" generic-family="text"/>
<font template="text" name="text" family="text" generic-family="text"/>
...
</font-substitution>
The template is the only mandatory attribute of <font> element. It specifies the key the font description will be stored at. This key is equal to the value of this attribute converted to the lower case. The value of this attribute is used for search the most matching font substitution rule (see Section ).
The name attribute specifies a font name (or a comma-separated list of font names) to be used for searching a font in Java environment while rendering tabs (see Section ).
The family attribute specifies a font family (or a comma-separated list of font families) to be used for composing the list of font family names to be written to XML FO (see Section ). If omitted, it will be set equal to the value of template attribute. This attribute is also used for searching a font in Java environment while rendering tabs if the attempt of finding font by name fails.
The generic-family attribute specifies a generic family name for the font to be used for composing the list of font family names to be written to XML FO (see Section ). If omitted, the font will have no generic family. The following generic family names can be used: "serif", "sans-serif", "monospace", and "script".
Usually the template value contains one or more words of the real font name separated with spaces. All substitution rules are grouped by the first word of their templates. For example, substitution rules for template="times" and template="times new roman" will be grouped together.
The algorithm of finding of most matching substitution rule is as follows (letter case is ignored):
1. | A name of RTF font is tokenized into words, interpreting white spaces, the hyphen sign "-", the comma sign ",", and the colon sign ":" as delimiters. |
2. | The group of substitution rules matching the first word of the RTF font name is selected. If no matching group was found, the algorithm stops. |
3. | The substitution rule having the most similar template with words of the RTF font name is selected in the group. |
If the algorithm selects a matching substitution rule, this rule is associated with the font and is used for subsequent font name replacements. Otherwise, a special substitution rule is associated with the font. Its family list consists of font name, alias font name, and non-tagged font name specified in the RTF font, and the generic-family value is created using the family attribute of the RTF font.
The font search algorithm consists of three steps:
1. | Font names specified in the name attribute are tested. |
2. | If the previous test fails, font names specified in the family attribute are tested. |
3. | If the previous test fails, font name, alternative name, and non-tagged font name in the RTF font specification are tested. |
If no appropriate Java font was found during all these tests, rendering of tabs with this font will be forbidden and a corresponding warning message will be placed in the log.
The fo:family attribute is composed from two attributes of the substitution rule associated with the RTF font. The composition algorithm depends upon the value of the "simple-font-family" option:
· | If this value is "true", the fo:family will be equal to the value of generic-family attribute (if specified), or to the first font name from the family list of the substitution rule. |
· | Otherwise, the value of the generic-family attribute is appended to the value of the family attribute. |
When RTF TO XML configuration is loaded, the font substitution file "fonts/default.xml" is parsed. It contains the following substitution rules:
<?xml version="1.0" encoding="UTF-8"?>
<font-substitution>
<font template="times" name="Times New Roman" family="Times Roman"
generic-family="serif"/>
<font template="arial" family="Arial" generic-family="sans-serif"/>
<font template="courier" name="Courier New" family="Courier"
generic-family="monospace"/>
<font template="symbol" family="Symbol"/>
<font template="zapfdingbats" family="ZapfDingbats"/>
</font-substitution>
This file specifies the following font substitution scheme:
· | All fonts having the "Times" as the first word are rendered using the "Times New Roman" or "Times Roman" font and are represented in FO under the family="serif" (in simple case) or family="Times Roman, serif" (in common case). |
· | All fonts having the "Arial" as the first word are rendered using the "Arial" font and are represented in FO under the family="sans-serif" (in simple case) or family="Arial, sans-serif" (in common case). |
· | All fonts having the "Courier" as the first word are rendered using the "Courier New" or "Courier" font and are represented in FO under the family="monospace" (in simple case) or family="Courier, monospace" (in common case). |
· | All fonts having the "Symbol" as the first word are rendered using the "Symbol" font and are represented in FO under the family="Symbol". |
· | All fonts having the "ZapfDingbats" as the first word are rendered using the "ZapfDingbats" font and are represented in FO under the family="ZapfDingbats". |
Pictures included in an RTF file can be in several formats, namely:
· | PNG (Portable Network Graphics), |
· | JPG (JPEG), |
· | WMF (Windows MetaFile), |
· | EMF (Windows Enhanced MetaFile), |
· | BMP (Windows device-dependent bitmap), |
· | DIB (Windows device-independent bitmap), |
· | MET (OS/2 metafile), and |
· | PCT (QuickDraw). |
While processing an RTF file, the converter extracts all pictures of these formats, names them as pictN with proper extensions, and stores them in the subdirectory of the destination file directory with the name of the RTF file in process and the “.images“ extension.
If some of these formats are undesirable (e.g. many FO rendering tools cannot process WMF pictures), you can convert them to other formats with the help of picture plug-ins. This conversion is applied "on the fly" if an appropriate converter is specified in the configuration files.
Plug-in configuration files are stored in the "plugins" subdirectory of the RTF TO XML home directory and have the “.config” extension. Each graphic conversion configuration file describes a conversion between two graphic formats. Conversions can be chained. For example, if one configuration file describes a conversion from wmf to png and other configuration file describes a conversion from png to another format, a wmf picture will be converted twice: first, to the png format using conversion rules from the first configuration file, and then to another format using conversion rules from the other configuration file. The reference in XML FO file will be automatically corrected and all intermediate files will be removed.
Since version 2.2.1, the distribution contains an example of graphics plug-in configuration file, namely "wmf2png.config", customized for use with ImageMagick (see Section 1.e).
The plug-in configuration file structure is quite simple. It contains comments starting from the ‘#’ sign, and configuration properties in the key=value syntax. The “plug-in-type” property must have the “graphics” value for a graphics conversion plug-in. If the “enable” property has the “true” value, the graphics conversion rules of this file are taken into account. Otherwise, this plug-in configuration file is ignored. Other properties are described in the following example:
# This configuration file describes wmf to png graphics conversion
# with the help of the ImageMagick tool (http://www.imagemagick.org).
# The plug-in type is the converter of graphics images
plug-in-type = graphics
# If the plug-in enabled, uncomment the next line
#enable = true
# Input image type
input-type = wmf
# Output image type
output-type = png
# Units, in which the output image size is measured. Allowed:
# pixels
# points
# inches
# The default units are pixels
size-units = pixels
# The output density in dpi (dots per inch) is used in the case of other
# units than pixels. The default density is 72 dpi here
output-density = 72
# Path to the command to be executed.
# It must point to the path where ImageMagick's convert program
# is installed.
# The backslash symbol should be doubled as in this example.
command = "C:\\Program Files\\ImageMagick-5.4.8-Q16\\convert.exe"
# Parameters passed to the command.
# The following substitutions are allowed in the parameters:
# &I is the input file name
# &O is the output file name (it is composed from the input
# file name by replacing of its extension from the input type to
# the output type)
# &D is the density substituted as an integer value
# &X is the horizontal size substituted as an integer value
# &x is the horizontal size substituted as a real value
# &Y is the vertical size substituted as an integer value
# &y is the vertical size substituted as a real value
# && is the raw '&' character
parameters = -antialias "&I" -resize &Xx&Y! "&O"
The picture conversion is controlled with the conversion density specified in the corresponding system property (see Section a). The option "-no-picture-conversion" in RTF TO XML run switches all picture plug-ins off (see Section 1.n).
Output plug-in configuration file allows specify a program to be started after successful conversion of an rtf-file to a fo-file. All output plug-in files must be stored in the “plugins” subdirectory of the RTF TO XML home directory. The distribution contains two examples of output plug-in configuration files, namely “fop.config” and “xep.config”.
You can prepare many output plug-in configuration files. While conversion from GUI, command line, or using a Conversion Task, the decision of applying a plug-in after successful conversion of rtf-file depends on the following conditions:
1. | If the “prepare-template” mode is turned on, using of output plug-ins is forbidden. |
2. | Otherwise, the value of “output-plugin” option is analyzed and a file with the given name and the “.config” extension is opened in the “plugins” subdirectory of the RTF TO XML home directory. |
3. | The value of the “plug-in-type” parameter must equal to “output” and the value of the “enable” parameter must be equal to “true”. If any of these conditions is not satisfied, the output plug-in is not activated. |
4. | In single conversion, the output plug-in is activated unconditionally. In batch conversion, the output plug-in is activated if the value of the “batch” parameter is equal to “true”. |
The syntax of output plug-in configuration file is quite simple. It is described in the following example:
# This configuration file describes conversion with Apache FOP
# http://xml.apache.org/fop/
# The plug-in type is the converter of graphics images
plug-in-type = output
# Uncomment the next line if the plug-in enabled.
#enable = true
# Uncomment the next line if this plug-in can be used in batch conversion
#batch = true
# A path to the command to be executed.
# It must be corrected to the path the FOP is installed at.
# The backslash symbol should be doubled as in this example.
########################## ATTENTION #############################
# To make the fop.bat (fop.sh) file working from any location,
# you must correct it and replace all relative paths in it to absolute ones.
command = "C:\\fop\\fop.bat"
# Parameters passed to the command.
# The following substitutions are made in the parameters:
# &I is the input file name
# &i is the input file name without extension
# && is the raw '&' character
parameters = "&I" "&i.pdf"
A file of user preferences is used in RTF TO XML GUI for saving a current GUI configuration. It can be also loaded with the –u option in the command line run or using the loadUserPreferences() method of the RTF_TO_XMLContext from Java API.
The default user preferences are stored in the “conf/rtf_to_xml-user.properties” file. You can select another file for user preferences specifying its path in the “rtf_to_xml.user-preferences” system property.
We describe here all control words processed with the RTF Parser now.
Notes on using rtf-commands in RTF TO XML are specified below command groups in italic shape.
Basic commands
|
|
|
|
|
|
|
|
|
|
|
Basic commands completely implemented.
Font and Encoding Support
|
|
|
|
|
|
|
|
|
|
|
|
|
|
|
|
|
|
|
|
|
Panose-1 information and some font families are not used in RTF TO XML because these have no analogue in XSL FO.
Preset and Custom Document Properties
|
|
|
|
|
|
|
|
|
|
|
|
|
|
|
|
|
|
|
|
|
|
|
|
|
|
|
|
|
|
|
|
|
|
|
The values of preset and custom document properties are needless in RTF TO XML.
Colors and Shading
|
|
|
|
|
|
|
|
|
|
|
|
|
|
|
|
|
|
|
|
|
|
|
|
|
|
|
|
|
|
|
|
|
|
|
|
|
|
|
|
|
|
|
|
|
|
|
|
|
|
|
|
|
Shading pattern styles and underline color are not used in RTF TO XML because have no analogue in FO. Other commands are used in RTF TO XML.
Style Sheets
|
|
|
|
|
|
|
|
|
|
|
Style sheets have restricted usage in RTF TO XML. Only style sheet numbers and names are useful in preparing templates. More extensive use of style sheets is planned in future releases.
Borders
|
|
|
|
|
|
|
|
|
|
|
|
|
|
|
|
|
|
|
|
|
|
|
|
|
|
|
|
|
|
|
|
|
|
|
|
|
|
|
|
|
|
|
|
|
|
|
|
|
|
|
|
Only solid, dashed, and dotted borders are recognized in RTF TO XML. More extensive implementation is planned in future releases.
Layout
|
|
|
|
|
|
|
|
|
|
|
|
|
|
|
|
|
|
|
|
|
|
|
|
All layout information is used in RTF TO XML.
Section and Column Formatting
|
|
|
|
|
|
|
|
|
|
|
|
|
|
|
The column width information is ignored because of restrictions of XSL FO. All types of section breaks are supported. Custom restart of page numbering is supported.
Character Formatting
|
|
|
|
|
|
|
|
|
|
|
|
|
|
|
|
|
|
|
|
|
|
|
|
|
|
|
|
|
|
|
|
|
|
|
|
|
|
|
|
|
|
Basic font properties are recognized, namely Bold, Italic, Small Caps, All Caps. Other font properties are ignored because they have no analogue in XSL FO. Underline style is ignored. Superscripts and subscripts are supported. Character scaling, expansion, shrinking, and kerning are currently not supported.
Paragraph Formatting
|
|
|
|
|
|
|
|
|
|
|
|
|
|
|
|
|
|
|
|
|
|
|
|
|
|
|
|
|
|
|
|
|
|
|
|
|
|
Almost all specified paragraph-formatting properties are implemented in RTF TO XML. Partial improvements are possible in future releases.
Table Formatting
|
|
|
|
|
|
|
|
|
|
|
|
|
|
|
|
|
|
|
|
|
|
|
|
|
|
|
|
|
|
|
|
|
|
|
|
|
|
|
|
|
|
|
|
|
|
|
Almost all table-formatting properties are supported in RTF TO XML.
Absolutely Positioned Paragraphs and Tables
|
|
|
|
|
|
|
|
|
|
|
|
|
|
|
|
|
|
|
|
|
|
|
|
|
|
|
|
|
|
|
|
|
|
|
|
|
|
|
|
|
|
|
|
|
|
|
|
|
|
|
|
|
|
|
|
|
|
Absolutely positioned paragraphs and tables currently not supported.
Footnote and Endnote Context
|
|
|
|
|
|
|
|
|
|
|
|
|
|
|
|
|
|
|
|
|
|
|
|
|
|
|
|
|
|
|
|
|
|
|
|
|
|
|
|
|
|
|
|
|
|
|
|
|
|
|
|
|
|
|
|
|
|
|
|
|
|
|
|
Basic implementation of footnotes completed. It supports the Arabic numbering and custom footnote separators. More extensive implementation is possible in future releases.
Label and Flow Destinations
|
|
|
|
|
|
|
|
|
|
|
|
Completely implemented.
Flow Control Commands
|
|
|
|
|
|
|
|
Completely implemented.
Document Variables and Bookmarks
|
|
|
|
|
Bookmarks are supported. Document variables are needless now.
Fields
|
|
|
|
|
|
|
|
The implementation of fields is sufficient. Minimal improvements are possible in future releases.
Objects and Word 97–2014 RTF Drawing Objects
|
|
|
|
|
|
|
|
|
|
|
|
|
|
|
|
|
|
|
|
|
|
|
|
|
|
|
|
|
The basic implementation of objects is done: the resulting destination is processed now. Shape processing is the following: if a shape contains an alone textbox, it is properly converted. Shape groups are ignored yet. In other case, the resulting destination of shape is processed. Z-order of shapes is not used yet. Textboxes are drawn under the paragraph they attached to. Wrapping text around shapes is not supported. More shape processing improvements are planned in future releases.
Pictures
|
|
|
|
|
|
|
|
|
|
|
|
|
|
|
|
|
|
|
|
|
|
|
|
|
|
|
|
Completely implemented.
Special Characters
|
|
|
|
|
|
|
|
|
|
|
|
|
|
|
|
|
Completely implemented.
Active Characters
|
|
|
|
|
|
|
|
|
|
|
|
|
|
|
|
|
|
|
|
|
|
|
All necessary active characters are processed in RTF TO XML.
The total number of parsed commands: 601
Since version 3.2, the customization of the converter for using with different FO rendering tools is essentially improved. We now provide different conversion solutions for different renderers and their versions using the new modular technology. We note here what is the difference between solutions applied.
Continuous section break is used for mixing different layouts on a page of a document. There are 3 methods of interpreting of continuous section breaks now:
· | Simple solution interprets every continuous section break as a break staring a new page. This solution is used in compatibility with FOP and elder versions of XEP and Antenna House XSL Formatter. |
· | Base solution uses the span="all" feature of the XSL FO specification. It allows mixing one-column and multi-column layouts in a page sequence. It is partially limited because mixing of multi-column layouts with different number of columns is impossible. This solution is used in default compatibility and in compatibility with Antenna House XSL Formatter version 2.5 or later. |
· | RenderX solution uses the rx:flow-section element from RenderX extension of XSL FO for composing multi-column layouts. It has no limitations in mixing different layouts. This solution is used in compatibility with XEP version 3.0 or later. |
There are 3 methods for horizontal positioning of tables now:
· | Simple solution is used in compatibility with FOP. A horizontal alignment of a table is calculated in the left indent and this indent is implemented by wrapping a table with an invisible two-cell table: the first cell has the width of the required indent and the last cell contains the table itself. Frequently, the required indent is negative. In this case, the FOP generates "Zero-width table column!" warning but positions the table correctly. Just ignore this warning. |
· | Base solution is used in default compatibility and in compatibility with Antenna House XSL Formatter. Table indents and horizontal alignment are implemented via fo:table-and-section element. |
· | RenderX solution uses a calculation of table alignment as indents and applies the indents to the fo:table element. This solution is used in compatibility with XEP. |